

Finding a solution for your leaking faucet could be a bewildering job as there are many faucets, and all of the processes look almost the same. And they look the same because they are.
But we have tried to make it as easy as possible for you. We all know that there are hundreds of faucets in the market. We have categorized them in just four. There will also be some tips for the first-timers out there.
So, we hope this will clearly show you how to repair a leaking kitchen faucet.

Types of Faucets
Yes, the repair process differs from model to model. But the difference is not too much. Simple common sense is enough to coup with these problems. But some basic knowledge is also necessary for DIYing the faucets.
And the first thing you have to be sure about is the type of faucet you are going to fix. Here are some of the most common faucet types.
- Compression Faucet – It has two faucets
- Ceramic Disk Faucet – It has a ceramic cylinder beneath the handle
- Cartridge Faucet – It uses a cartridge for controlling the water
- Ball Faucet – It uses a ball beneath the handle to control the water
There are hundreds of types of faucets. But these four are the most common (more than 90%). If yours is some other kind, see if you can match that with one of the four above as there is a good chance the faucets will be similar. Otherwise, you should google for that specific faucet type.
Fixing Leakage of Compression Faucets
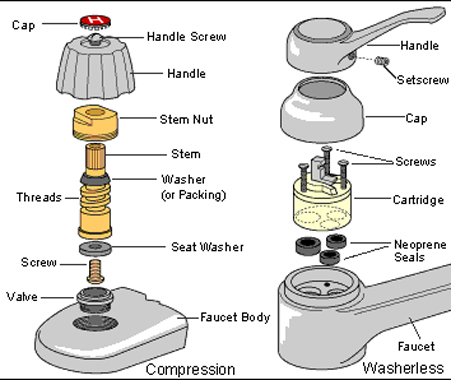
You can identify these faucets by their dual handles. To fix the leakage, you first have to remove the handles. You may use a screwdriver to take it off. Then use a wrench to remove the nut. After removing the wrench, inspect the O-rngs and washer, which are located under the nut.
If the faucet was leaking from the handles, you should change the O-rings. And if the faucet was leaking from the body, you should replace the washer. Makes sure that the replacement parts match your faucets. Take the existing part in the hardware shop to find the perfect match.
After the replacement, reassemble the handle, and your problem will be solved.
Fixing The Leakage of Ceramic Disk Faucet
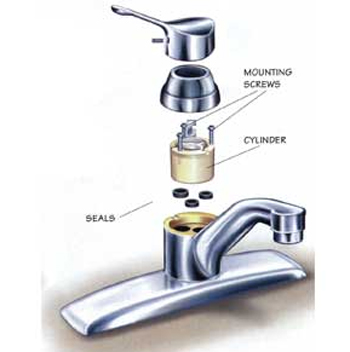
Disk faucet has an excellent reputation for preventing leaks. But they too can be cursed by leaking. So, here is how you can fix it.
Here, you also have to remove the handle first. Then you have to remove the escutcheon cap. This metal cap generally sits directly beneath the handle. Your main objective is to get the neoprene seals. These seals sit under the disk cylinder. Removing those cylinders will expose the seals. Now it’s time to clean them.
Soak the seals in vinegar for more than two hours. But if you think that they are in very bad shape then go for new ones. Now, it’s time to reinstall the seal and reassemble the faucet. Don’t forget to soak the ceramic disk as it can break when you turn on the water forcefully.
Fixing The Leakage of Cartridge Faucet
Cartridge faucets are getting very popular nowadays due to their low cost. But they are the hardest to fix. But we will try our best to make it easy for you.
Again you have to remove the handle with proper tools. After removing the handle, see if your faucet has a retaining clip. This circular clip is used to hold the cartridge in place. You have to take it out using pliers. If it isn’t there, then directly remove the cartridge.
Then take out the faucet spout and locate the O-rings. You have to remove the O-rings as well. If they are hard to remove, just cut them out. After getting the replacements from the store you have to install the new O-rings. Try plumbers grease or Vaseline before putting it in. And reassemble the rest of the faucet.
And you are done.
Fixing The Leakage of The Ball Faucet

Ball faucets are elegant looking, but they are expensive to fix too. You will have to buy multiple replacements and maybe some tools as well. It will be far more comfortable if you buy a repair kit. Now here is how you are gonna go the fixing.
First, you have to remove the handle. And the removal process is the same as all the other. Using a wrench or plier, you have to remove the cap and collar. Then you have to remove the cam as well as the washer and the ball. Removing the cam is a lot easier with the repair kit.
Then you will see the seals, O-rings, and springs. Remove all of them and take the help of any pliers if you have to get into the structure. Install new O-rings. If you feel the need for other components, replace them as well. Your repair kit should come with all of them.
After you have installed all the components, put the faucet back together. If you don’t have a repair kit, then get the replacements from your hardware store.
Some Tips
Here are some tips that should be handy when fixing your faucet-
- Use thick tape around your wrench to prevent scares on your faucet.
- Take your existing part to the store if you are looking for replacement parts
- While looking for replacements, see if you have the part number. With that number, you can get an identical copy of the previous part of the company.
- Try using Vaseline if plumbers grease is not available where it is needed
Try to replace all the components of the faucet as you don’t know which one is actually causing the problem. But if you have trained eyes, you can be sure of the problem.
Hope these will be helpful for you
Some Words About the Touchless and Commercial Kitchen Faucet
The process of fixing leakage of touchless or commercial kitchen faucet is almost the same as the regular faucets. But you have an extra advantage with them.
Manufacturers of those faucets, most of the time, give ample amounts of warranties and other after-sale facilities. So most of the time, you are coved by those facilities. If anyhow you are not, those brands try to make sure that you can fix it yourself by using their online and offline guides.
However, the fundamental process is the same. Just one or two extra components here and there.
Let’s See the video How to Fix a Leaky Faucet with a Single Handle Design:
Conclusion
Follow the guide, and you will save some money. Because calling the plumber is not a cheap option. Moreover, fixing your house is a nice excuse to spend some time at home.
And we hope that we were helping to make more of that day by showing you exactly how to repair a leaking kitchen faucet.