

The faucet is another useful invention of science. From the beginning of human civilization and the ancient era, people are using water supplies to live their life. In this modern time, when water is essential every day and every moment, manufacturers came up with the idea of modern kitchen faucets.
Now, when your faucet is not working and you want to simply change or replace it, you need to go through several steps. These steps are easy and you can do it all by yourself. The steps are different for types like touch faucets and touchless faucets. Let’s discuss those steps here to fix your faucet.
In this article, we’ll be sharing how you can take apart a moen kitchen faucet and fix it or replace it. Let’s start from here!
How to take apart a Moen single handle cartridge faucet
If you have a cartridge faucet installed in your kitchen, most probably it’s from the brand called Moen. The brand Moen is a big name in the industry. They’ve been making cartridge faucets for a long time now and they’ve cut the market pretty well.
In the process of taking apart a Moen cartridge kitchen faucet, you need a few tools. Those are:
- Screwdriver
- Wrench
- Needle nose pliers
Step 1:
First things first, turn off the water supply line from the bottom of your sink. You’ll find two valves there that are for hot water and cold water. Turn them off by turning the valves counterclockwise. This will make sure that no water is coming through the lines anymore. If you go to remove your faucet without turning the water supplies off, you’ll end up in your kitchen mess.
Step 2:
Drain the faucet and the pipes properly. Even if you turned off the supply lines for both of the faucets, there might be some water remaining in the pipes and lines. Your Moen faucet must have to be empty before you remove those.
Step 3:
Cover the draining system of your sink. As you’ll be removing your moen kitchen faucet, there are chances that small particles will pass through the drain system. Your faucet parts are pretty important and you have to make sure that you’re losing no objects from your faucet.
Step 4:
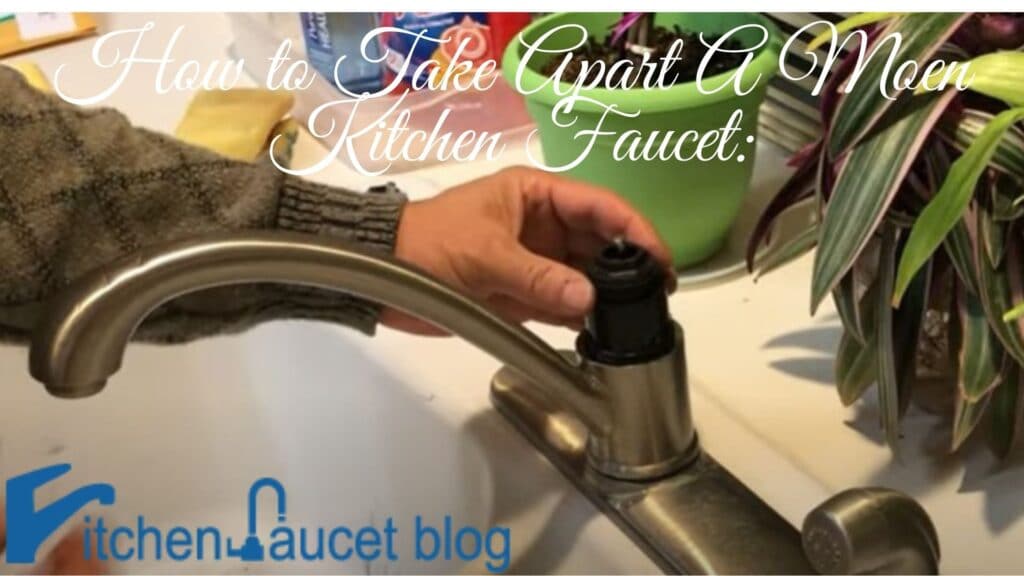
Now, you have to remove the handle carefully. You need a specific kind of screwdriver in order to remove the handle. First, you have to remove the cap of the handle. Then you need to locate the screw that holds the handle still.
Finding that screw is a bit of a tough task to deal with as it’s smaller in size but you have to find it somehow. You can feel the screw when you insert the Allen screwdriver there. Loosen the screw safely and remove the handle. You can also use a wrench to do that. When everything is loosened properly, pull the handle straight up.
Step 5:
Now, you have to remove the plastic sleeve and the dome as well. You can see it when you removed the handle carefully. When the handle lever is totally detached, you’ll see a dome. You just need to slide it out easily.
After that, there’s a black jacket that’s called a plastic sleeve. It needs to be removed. You need to use a wrench to remove that. Turn it counterclockwise in order to remove the black jacket.
Step 6:
The 6th step is to remove the handle mechanism. The handle mechanism is that thing that controls the water flow and its heat. When you remove the black sleeve, you can see the handle mechanism clearly. It stays below the black sleeve. There’s a screw. The main task of this screw is to hold the handle mechanism properly and help it work firmly.
You have to remove the screw using a screwdriver. Find out a suitable screwdriver that works well with that screw. Once you unscrew the screw, the whole mechanism will be loosened, and eventually, it’ll come out. You need to do this carefully. Otherwise, you’ll break the handle mechanism down. It’s a bit sensitive thing to handle.
Step 7:
In step 7, you need to remove the washer and the ring. You can find them under the handle mechanism. You can find a white ring that comes easily. You need to remember the direction of that ring so that while placing it back, you can do it properly.
The washer is a bit harder. Sometimes, it gets stuck. You need to use an adjustable wrench to remove the washer. Just hold the washer and turn it counterclockwise to remove it. This process is easy as well.
Step 8:
The next thing you need to do is to remove the spout carefully. When removing the rings and the washers are done, you can move forward to remove the spout. For rings and washers, you must remember their sequences and directions carefully. You can write them down as well. When you’re setting everything back after fixing, it’ll help a lot.
To remove the spout, you don’t need any special tool or any other particular tool. You can remove it softly with your hands. Remove it carefully and make sure everything is okay. When the spout is removed, there’s a little more to do.
Step 9:
After removing the spout, you can find out a clip there. This clip basically holds the spout and the cartridge together. When the spout is removed, you need to remove the clip using an adjustable wrench. After removing the clip properly, you need to remove the cartridge.
You can remove the cartridge with pliers. You need to hold the stem with the pliers. After holding the stem, you need to twist the cartridge in multiple directions. Eventually, it’ll be loosened and come out.
Step 10:
When removing the faucet upper part is done, you need to focus on the down parts. There are different lines there. You need to get rid of them in order to detach the faucet properly. First of all, find out, which lines are there sitting.
Step 11:
Cut the supply lines and detach them perfectly. As you’ve turned off the water supply lines before, you need to cut them off. Some of the Moen faucets feature interchangeable supply valves. You can remove the lines easily then.
Step 12:
After the supply lines are removed properly, you need to focus on the faucet base. You’ll find out mounting nuts there that are holding the faucet with the sink properly. When you find out the mounting nuts, loosen and remove them with the help of a basin wrench. This process is pretty straightforward and less complicated.
When the faucet mounting nuts are removed properly, you’ll be able to remove the faucet and pull it up straightly.
Step 13:
So, your Moen faucet is totally removed and taken apart now. Clean the debris and water deposits you can find there. Don’t forget to run on possible repairs as well.
Conclusion
So, this is how to take apart a Moen kitchen faucet. With these processes, you can easily remove and detach your faucet parts. Whenever you feel like your faucet is a bit problematic or it’s acting abnormal, you need to go through possible and required repairs. For those repairs, taking apart the faucet is pretty important.
In this article, we’ve tried to cover how you can remove and take apart your kitchen faucet step by step. To read more articles like this one, feel free to visit our website. If you have any questions, leave a comment here or contact us directly.